Translate

Showing posts with label Counted Thread Embroidery. Show all posts

Wednesday, June 17, 2020

What is Counted Thread Embroidery?

  1. Assissi
  2. Berlin Work, Cross Stitch
  3. Blackwork (Spanish)
  4. Drawn Thread
  5. Hardanger
  6. Huck Embroidery
  7. Lagartera
  8. Kasuti (Ethnic Indian Embroidery) 
  9. Pulled Thread

Free Counted Thread Embroidery Books
The major source of embroidery books in the Public Domain is The Antique Pattern Library

Resource: Project Gutenberg's Beeton's Book of Needlework, by Isabella Beeton, pages 561-584
  1. Berlin Work includes every kind of stitch which is made upon canvas with wool, silk, or beads. The principal stitches used are common cross stitch, Gobelin stitch, leviathan stitch, raised or velvet stitch, tent stitch, and others. 
  2.  Before beginning to work upon a piece of canvas the raw edges must be hemmed or [560] sewn over with wool. 
  3. Care must be taken not to crumple the canvas in the course of the work. It is best to roll one end of the canvas upon a round piece of deal while the other end is kept down upon the table with a lead cushion. Handsome artistic patterns should always be worked in a frame. 
  4. When you undertake to work a large pattern begin in the centre, and complete one half before you commence the other. 
  5. Always work the stitches in the same direction, from the top downwards--this is very essential to the beauty and regularity of the pattern. 
  6. Edit in your own words

Swalm


I bought this book a couple of years back and found it worth the money I spent on it.

What I liked best about this book is - Christine Bishop has used different design details for each element- in effect, you get to work all the possible combinations.  Instructions are very clear and satisfactory.

The outlines are worked in chain stitch followed by a row of coral stitches - then embellished with buttonhole stitch variations.

The smaller design elements are worked in padded satin - the large ones with a combination of draw and pulled thread designs.

The edging is needle made lace -though it looks like crochet.


Needle made lace is more intricate and time consuming than crochet. But the finished product is always worth the effort.

Sunday, October 06, 2019

Even Weave Fabric

In an even weave fabric, the number of weft and warp threads per square in is the same.

Warp  - the lengthwise threads on a loom over and under which the weft threads are passed to make cloth.
Weft or Woof - in weaving , the crosswise threads that are passed over and under the warp threads on a loom to make cloth
For more details check this link

Wednesday, March 25, 2015

Lagartera Embroidery Project with Chart and Design Elements

I finally got around to charting this Lagartera embroidery design.


Here's the chart.  I've reduced the size because the original is too big. You click on the image to enlarge it.


I have posted the lower half of the chart only. 

I am posting a separate with the design elements.  Use that for the actual working and use the chart above as reference for placement of the different elements.

One nice thing about geometric patterns is, it will suffice if you can chart just one quarter of the pattern. More often than not, the other three are nothing but mirror images of the adjacent quarter.

While working such patterns, it's always a good idea to start at the center.

Here are the design elements I used for this particular pattern. You can use them to create your own.

Do leave a comment to let me know if this helped.

Friday, March 20, 2015

Birds in Cross-Stitch


This pattern is from an Ondari cross-stitch book. The birds are simply too cute and I just had to embroider this. I had no definite plans when I started out. My mom made it into a sling bag.


Saturday, March 29, 2014

Lagartera Embroidery Chart for Duck and Duckling Cushion

Here the close up of the Lagartera Border in the Duck and Ducklings cushion cover.


Most Lagartera patterns are repeat patterns. As you can see, Border 1 in the chart is supposed to represent the lower border in the close-up.  I have improvised while working the embroidery because, I wanted the dimension of the triangles to be smaller.


Each square represents 1 hole in the even weave fabric.

Border 1: The longest line is worked over 9 squares - yarn is brought up at square 1 and taken down at square 9. The line covers 7 unworked squares. The next line is one square smaller and so on. The smallest is worked over 3 squares - yarn is brought up at square 1 and taken down at square 3. It covers just one unworked square.

Border 2: The longest line is worked over 9 squares and the shortest over 3. Diagonal lines cover 3 diagonal squares.

Hope you found this post informative.  Leave a comment and let me know what you think.

Friday, March 28, 2014

Cross- Stitch - Duck and Duckling Cushion Cover

I finally completed the duck and duckling design I started way back in December. Working on this pattern has finally brought home to me the fact that I am really growing older. My eyesight is no longer what it used to be; despite my glasses. When the pattern was almost complete, I discovered a wonderful method to circumvent this problem.  But, I'll reserve the method for another post.

So, here's the completed project.


I used Lagartera embroidery to frame the upper and the lower edges of the pattern. I'll post a chart when I complete the charting. It has given a lacy and exotic look to an other plain design. 

Update 29th Mar 2014: I have posted the chart as promised.

Here it is sewn into a cushion cover.

Thursday, March 27, 2014

How to Prepare Fabric for Counted Thread Embroidery

Preparing The Fabric
  • The finished size of the cushion cover I plan to make is 15" x 15". So I cut out 15" x 15" square with 1/4" seam allowance all round.
  • Fold the fabric in half lengthwise and width-wise.
  • Mark the fold lines with marking chalk. Mark the center of the fabric. As already mentioned in point 3 above, I'll use some point close to this as my starting point. 
  • Lines extending up and down from the center mark the center of block 8 lengthwise and the center of block 7 width wise.
  • Yes I've divided the entire fabric into blocks of 10 holes as marked by the red lines in the picture above. I have 15x13 blocks.
This is not as pointless an exercise fit only for a fanatical perfectionist.  It has its uses.  In this case, I discovered that this particular fabric is not even weave. An even weave fabric has the same number of warp and weft threads; lengthwise and breadth wise yarn. If the fabric were even weave, I'll have either 13x13 blocks or 15x15 blocks. This means, I have to think a bit before deciding on design placement.

Sunday, December 15, 2013

Cross-Stitch Designs - Duck and Duckling

Duck and Duckling Design
After a really long time, I am taking up a cross-stitch project. There was a time when I was crazy about cross-stitch; because that was about the only stitch I knew. My maternal grandmother encouraged me. She always bought me all the materials I wanted but my paternal grandmother discouraged me. She believed her interest in needlework cost her her eyesight. She lost her eyesight to cataract when she was 60 and she lived in blindness for 30 years. Apparently needlework is in my blood.

Whenever I showed my maternal GM my cross-stitch projects, she would always check the wrong side of fabric first an insist on a neat finish. At that time I was annoyed with her for not appreciating my effort. But now I understand the wisdom of her efforts to guide me.

In my 18 years of teaching needlework, a lot of people have asked me the procedure involved in starting a project. So, here I am blogging the steps.

This book is a gift from a friend. It has a lot of lovely designs for cushion covers.


These ducks and ducklings have been calling out to me for years. I've finally decided to answer their call.


Here's the chart.
  1. This section of the chart has 14 columns and 7 rows of 10x10 blocks. 
  2. The first step is to locate the center. It's the point where a line drawn along column 7.5 and row 3.5 meet. I've marked the point - indicated by the down arrow. 
  3. I'll choose something close to this point as my starting point and proceed from there.
Choosing Yarn

When choosing yarn, you can follow the colour codes given in the chart. But, if you live in a different country, use a picture of the finished project featured in the book rather than the colours in the chart as a guide.


Use a tapestry needle for all counted thread embroidery rather than your regular sewing needle. Let me know if you have any doubts.

Share this post if you like it and I'd love to hear your commnts

Saturday, March 09, 2013

Step by Step Working of Assissi Embroidery

Origin: Assissi Embroidery is a style of embroidery that evolved in the 13th and 14th century in the Italian town - Assisi. In 1902, this style was saved from obsolescence and popularized by Saint Francis of Assisi. Inspiration for new designs was drawn from the relief stonework and the exquisite carvings in the chests and other wood work found in the church.  The churches of the town have done their bit to carefully preserve some of the earlier work. It's thanks to them and to those who turned Assissi embroidery into the cottage industry of the town, that we know what we do today, about this lovely embroidery. The style has some distinct features that make it easily identifiable.

Identifying Assissi Embroidery: The design itself is void while the outlines and background are embroidered in Holbein and cross stitches respectively. Sometimes in places like near the head of birds etc, a slanting stitch is used. The subjects like demons and animals usually look mean  and the earlier designs were usually very crude.  Floral motifs too are used. But they don't seem to be as popular as the demons, birds and animals. There is almost always a border worked completely in Holbein stitch with maybe a cross-stitch here and there.

Fabric: We should remember that a couple of centuries ago, fabrics expect for perhaps silk or satin, were more loosely woven or coarse, so the outlines were drawn directly on fabric and then embroidered. These days we have to use Aida fabric or end up with eye problems.

Colours Used: Faded sky blue and rust brown tones were the commonly used shades in the original work. Later on, a dark blue, bright red and a bronze yellow etc were introduces to make the work looked brighter. The outlines of the designs are done in a deeper contrasting colour such as black, dark blue or green or even a vivid red.

The Design Elements
There are 4 elements - the outlines, the voids, the cross-stitch and the border framing the designs. They are worked in 3 steps.

Step 1: Holbein stitch done in 2 rows- the first laying the outline  and the second completing the outline in a return journey.

The DMC Assissi Embroideries book recommends that you work all complementary lines that depart from the main design (like the detailing of the swans feathers in the image below), while working the first row itself.

Here's an interesting tidbit. Spanish Blackwork and Kasuti of Karnataka also use the Holbein stitch. The stitches in all three styles are worked such that, but for the knots, it is impossible to distinguish between the right and the wrong side of work. Only, in the case of Assissi, once you fill in the cross stitches, you'll know.

Step 2: Filling the background with cross- stitch.


Step 3: Working the borders in Holbein stitch. 

Resources:

1. Reader’s Digest – Complete Guide to Needlework - I own a copy of this book. An excellent buy.

2. Mary Thomas's Embroidery Book - again an excellent buy

Monday, March 26, 2007

Lagartera Embroidery Project with Chart and Design Elements

I finally got around to charting this Lagartera embroidery design.


Here's the chart.  I've reduced the size because the original is too big. You click on the image to enlarge it.


I have posted the lower half of the chart only. 

I am posting a separate with the design elements.  Use that for the actual working and use the chart above as reference for placement of the different elements.

One nice thing about geometric patterns is, it will suffice if you can chart just one quarter of the pattern. More often than not, the other three are nothing but mirror images of the adjacent quarter.

While working such patterns, it's always a good idea to start at the center.

Here are the design elements I used for this particular pattern. You can use them to create your own.

Do leave a comment to let me know if this helped.

Tuesday, October 17, 2006

Huck Embroidery Sampler

Been real busy. I wish there are more hours in a day to do all the things I want to do.

I am posting a couple of Huck embroidery patterns I managed to get done for my Huck Sampler.


There are a few more patterns I am working on. I'll post pictures as soon as I complete them.

Huck Embroidery Patterns

A couple of friends and I have decided to go for a walk atleast three days a week. The crazy thing is the only time all 3 of us are free is between 2 p.m to 3.30 pm. 
We try to have an early lunch (around 12.30 p.m) and go out with shopping bags braving the hot afternoon sun. Our husbands call us crazy and mine says the sun is making me crazier. All in all we are having a nice time.

Here are the patterns I promised.


I found the first pattern in the second picture in a shopping bag that used to belong to my grandmother who passed away 5 years ago. It was done as a repeat all over pattern on pista green fabric. She had used the basic green, blue and red threads for the embroidery.The piece is very old probably 40 yrs. Figuring out how the pattern was done was a bit difficult, as the piece was obviously washed and ironed several times over the years. It is actually very simple, as you can see by clicking on the picture for a larger version.


I don't particularly like the next two patterns. But I have learnt over the years that one man's poison is another man's food. There is no telling what my students will like. This, after all is a sampler of patterns.

Monday, June 12, 2006

Lagartera Embroidery

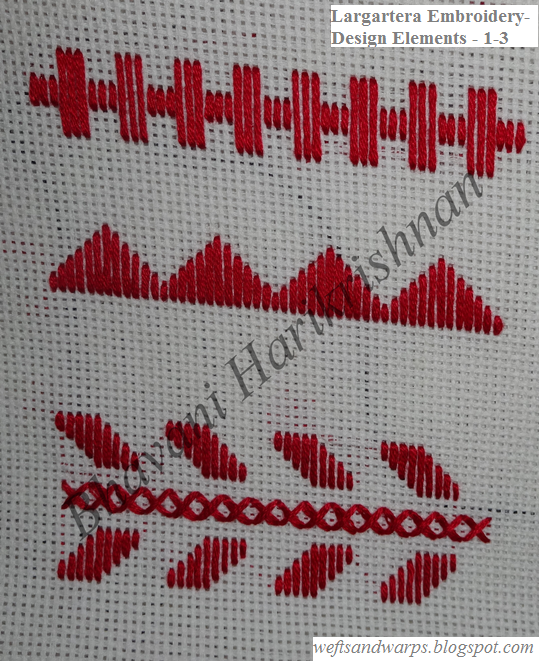
Lagartera is a style of Spanish 16th century embroidery that originated in a village of Lagartera, Spain The main stitches used are stroke stitch (Holbein stitch), the satin stitch blocks and the four-sided stitch.  Considering the nature of the stitches, this embroidery is worked on even weave fabric.

Sometime in 2006, I came across a website with a lot of information about this style of embroidery. Unfortunately, it's no longer there and the there is dearth information regarding this. I save the pages mainly for the images. So, I do have something to work with.

I decided to use these stitch images and dream up my own combinations and this is what I came up with. I simply started at the center and added proceeded as the mood took me. I am yet to chart it. When I do, I'll add the link to it here.


Update: 25/3 2014 - Here's the chart.

Thursday, June 08, 2006

Huck Embroidery

My latest project is Huck embroidery. I have started embroidering a table cloth in this style. It might end up as a runner.

I have 7 uncles on my mother’s side. But for 2 the rest were craft enthusiasts. One of them still is. She does a lot of Huck embroidery. Her son-in-law is an engineer in the army and they get free army issue toweling cloth (I don’t know why this fabric is called so, maybe they were originally issued to be used as towels) on which this style of embroidery is done. Every time she visits her daughter in Delhi, she gets together with the neighbors to embroider. The funny thing is my aunt speaks only Tamil or Telugu and her embroidery friends speak only Hindi. God knows how they manage to communicate. But she comes back with a lot of lovely patterns copied from somebody’s grandmother’s shopping bag or somebody’s mother-in-law’s tablecloth embroidered some 20 – 50 years ago. And every time I visit her, I have something new to add to my collection.
Over the years I have accumulated quite a few patterns myself, some from my own grandmother, some from my mother’s imagination, some others from my school days, some from the collections of my students’ mothers or mothers – in – law. I found it mostly done on shopping bags.

While researching the subject recently, I found this blog 

Swedish Huck Embroidery  has posted some samples and the pictures are very clear.

Complete Guide to Needlework – A Reader’s Digest Publication has a chapter on this topic.

Thursday, April 20, 2006

The Embroiderer's Garden

Just returned from teaching Kutchwork to a batch of 7 students. It was a 4 day course. 5 out of the 7 mastered the technique. They want me to extend the duration to atleast one more day to clear all their doubts. So, I'll be busy tomorrow also.
After that who knows, they may sign up for my other courses.

I bought a couple of books on my trip to Chennai last week.

The Embroiderer's garden by Thomasina Beck is one.
I bought it because after reading so many craft blogs I noticed that most avid embroiderers are also avid gardeners. The title naturally made me curious and after browsing through it, I simply had to have the book. As the title implies, there are all sorts of wonderful gardens done in applique, counted thread, blackwork, brazilian stlye. There are no instructions. Plenty of ideas for compositions and some very striking examples but no instructions. Nevertheless it is a good book.

The second book is The Anchor Book of hardanger Embroidery. It contains dom 40 stitches and motifs.

Sunday, March 12, 2006

Huck Embroidery Table Cloth

This is a Huck embroidery tablecloth we did in Needlework Class when I was in class IX - 1982. It looks a bit shabby up close as I never bothered to hand wash it. Now I regret it because I am not able to get the special fabric this kind of embroidery is worked on. May have to improvise.


Here is the close-up anyway.